
Acrylic Mediums alter acrylic paint in all sorts of interesting ways. Pouring Medium, for instance, allows the paint to flow so it can be poured onto surfaces, and dry without cracking. I used this medium to make Halloween Skins, Pumpkin Decorations, and some Gerhard Richter inspired paintings.
Another medium, Glass Beads Gel, adds a glossy, bead-like texture to your work, and can be mixed with acrylics or added on top. This medium added a perfect finish for Painting A Galaxy, and a fun texture to Puzzle Piece Pins.
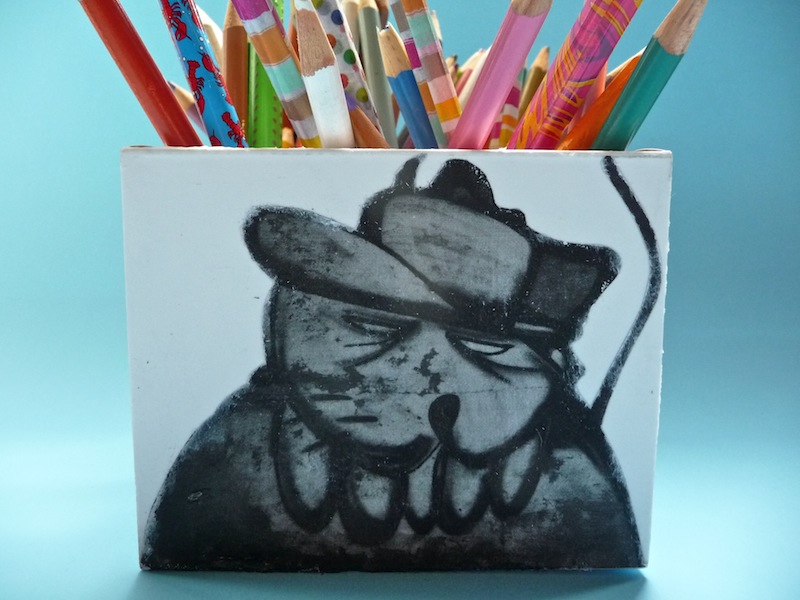
Recently, I picked up some Acrylic Gel Medium which not only alters the texture of acrylic paint, but enables you to transfer printed images onto other surfaces, making it ideal for creating layers in collages and mixed media. In this instance, I simply used it as an adhesive to transfer images onto a box and future pencil holder. It turned out to be super easy to work with.
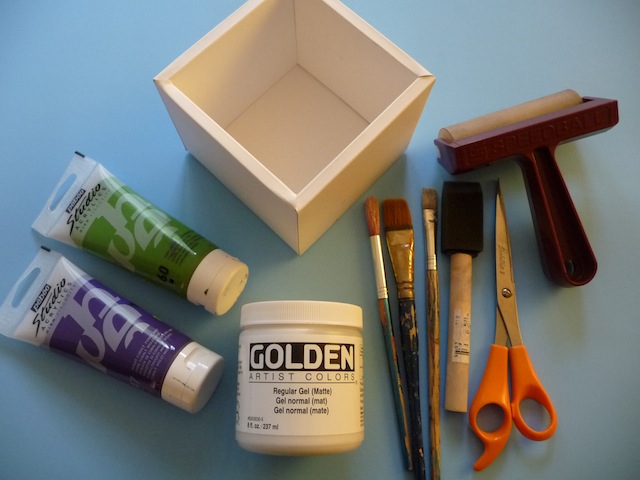
Materials
- images to be transferred
- scissors
- Acrylic Gel Medium
- flat paint brush or foam brush
- brayer
- surface to transfer images on eg. wood, canvas, paper, cardboard…
- spray bottle with water or container with water
- sponge or paper towel
Instructions
1. Transferring an image is the cool process of moving an image from its original surface, onto another. It’s ideal for using in collages and mixed media. When selecting images to transfer, make sure they are either photocopies or laser printed. Ink jet printed images will work, but not as well. You can also use images from newspapers, non-glossy magazines, and books. All the images I used were laser printed – two from photographs I took, and two from the internet, which are beautiful illustrations by the artist Phlegm.
Experiment and see what works and what doesn’t. And if using text, keep in mind that the image will be reversed once transferred, so make sure you’re working with reversed text.

2. Images can be transferred onto many different surfaces. At this point, I’ve only tried cardboard, but heavier weight paper, wood, and canvas would also work well. Images can also be layered onto other images, paint, and fabric. Again, it’s all about experimenting and seeing what works.
3. Once you’ve chosen an image, cut it out, and apply Acrylic Gel Medium to the image using a flat paint brush or foam brush. I used Golden’s Regular Gel (matte), although other types will work as well. Apply the image, face down, onto the surface you are transferring on, and if necessary, lift up any edges to apply additional gel medium.

You can also apply the medium directly onto the surface you’ll be placing the image on. Results will be the same.

Use a brayer or similar tool, to remove any creases and/or air bubbles. Allow to dry completely. This can take several hours.

4. Once dry, apply a small amount of water to the image. A spray bottle works well for this, although any method will do. Allow it to penetrate.

Using either your fingers, a paper towel or sponge, begin rubbing off the pulp. I initially used my fingers, but after a while switched to a paper towel, because it does take its toll on your poor fingers.

Take care when rubbing off the pulp, since part of the image can also come off. Once all the paper has been removed, you will see the transferred image. It’s a cool process that can be very interesting to use, when layering in collages and mixed media.


I was recently talking to a friend about this! I want to give it a try, and needed the info. Thanks!!! 🙂
Oh that is so cool! I have never heard of gel medium, but I’m going to look for it at our art store.
Wonderful! Can’t wait to do a little more experimenting with it.
Thank you for excellent instructions on this method. I’m looking forward to your next post for inspiration on how to apply it to one of my own projects!
Thanks Joyce. After what you told me, I looked for your comments in the trash and found this one. Still looking into why this is happening. Strange…
We do a great deal of art in our home and I like exposing my children to new materials and supplies. Thank you for the excellent tutorial. This gel medium is totally new to me.
Thank you so much, I really appreciate it, and hope you get to try it out!
This would be adorable for school book bags and pencil holders!
Thanks for linking up with Family Fun Friday! 🙂
Thanks Selena!
Pingback: Educational Crafts for Kids - Look! We're Learning!
Amazing crafts! Love if you share this on Fabulous Friday Party
Thanks Maria
Thanks Maria! Will definitely do that.
Pingback: Halloween Coasters | ArtClubBlog
Thanks for sharing this on Fabulous Friday last week, the image transfers are really cool! Hope you stop by next friday and submit another great post.
Maria