

Part of this year’s vacation involved heading to the beach in Nova Scotia, where I was finally able to try my hand at sand casting. It was as cool as it sounds, and kept us busy for a while, as we looked longingly at the Atlantic Ocean, which was way too cold to swim in. What is it about the Atlantic anyway? Even in Portugal, with scorching hot temperatures, it took a lot of enticing to get me in those frigid waters. Next year, I’m thinking warm Mediterranean…
Materials
- Plaster of Paris
- container for mixing plaster
- container for water
- mixing tool eg. spoon
- stones, seas shells etc. for casting
- old paint brush (optional)

Instructions
1. Even if you’re not near a beach, but have access to some sand, your kids can enjoy this activity. You will need some items to cast in the sand, like stones and sea shells, so spend some time collecting these first, then gather your supplies and head to the beach. Make sure to bring fresh/tap water with you, because salt water may affect how the plaster sets.
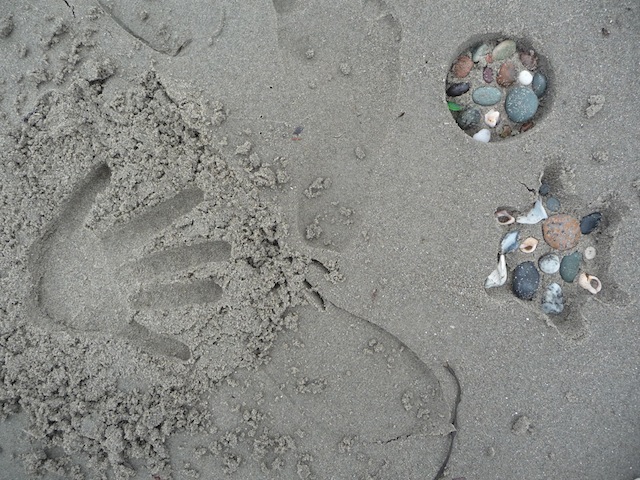
2. Use the bottom of a bucket or container to make a depression in the sand. It should be at least 1 inch deep, and the sand should be wet enough to hold the shape. Place items you would like to cast, face down in the sand.
3. Mix the Plaster of Paris according to the instructions on the container. Pour the plaster into the shape where you have placed the items. Allow to set. This should take anywhere from 30 minutes to one hour.

4. Dig under the plaster with your hands to remove it from the sand. Flip it over and make sure the plaster has set.

Use an old paint brush to gently remove the sand, and pretend you’re an anthropologist who just made a fabulous discovery. Or skip this part and give your casts a good rinse in the water to remove any excess sand.

If you’re hand or foot casting, and are finding it difficult to make a deep enough impression in wet sand, here’s a great tip I came across on another blog: loosen up the sand using something like a stick or a spoon, then make your impression.
Impressions can also be modified by using your fingers to extend the shape and to make it star like, etc. You can also poke holes in the sand, which will fill up with plaster to give an interesting look. Endless possibilities…so have fun!


Fascinating process. Really enjoyed your post. Thank you.
Thank you Don 🙂
How fun! Love how it turned out.
Thanks so much!
Thanks for sharing this great tutorial! I am pinning it to use later.
Wonderful! Thanks Keitha 🙂
I’ve always wanted to try this! Way to make your own souvenirs! Pinned it and thank you for the details!
So glad you liked it!
Fun! That would make a great souvenir from a family vacation.
Thanks for dropping by 🙂
Lots of fun! I think I better take along some plater of Paris next time I go to a beach! Thanks for sharing with SYC.
hugs,
Jann
Don’t leave home without it!
Oh wow very cool idea! Thank you for sharing this post at City of Creative Dream’s City of Links last Friday! I appreciate you taking the time to party with me. Hope to see you again this week 🙂
Pingback: Beach MAgic for the July Blog Hop 2022 - Connection Keeping