

It was on this day in 1852, that Spanish Catalan architect, Antoni Gaudi, was born. His unique and imaginative style can be seen in the magnificent church, the Sagrada Família, and Parc Güell, where mosaics cover benches and ceilings throughout the property. It was amazing to see his work on a visit to Barcelona several years ago, and interesting to see how his designs were inspired by the things he was most passionate about, like nature. Children can easily incorporate meaningful objects they’ve gathered, along with mosaic tiles, to truly personalize this project. So gather up your bits and bobs, so we can celebrate the wonderful world of Gaudi.
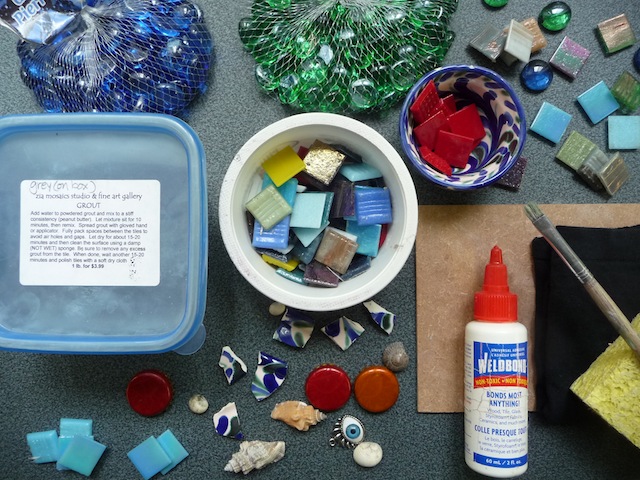
Materials
- mosaic tiles
- assortment of small items to be used in the mosaic eg. broken ceramic pieces, glass beads, seashells, etc.
- Weldbond Adhesive
- small paint brush for applying adhesive
- solid base for mosaic eg. wood
- grout
- old container and mixing tool for the grout
- pair of latex gloves
- water
- sponge
- cotton cloth eg. old tshirt
- toothpick or wooden skewer
Instructions
1. This is a fairly simple mosaic project, which doesn’t involve any tile cutting, therefore making it suitable for younger children as well. Just avoid using anything with sharp edges. Once you’ve selected a hard surface to make this mosaic on, play around with the items you’ve chosen to include, to determine the layout. Glue the items on by adding Weldbond Adhesive to the bottom, using a paint brush. If using mosaic tiles, remember to apply glue to the back of tiles – the side with ridges. Once all the objects have been glued down, allow to dry completely before grouting.

2. Prepare grout by placing it in an old plastic container, and adding small amounts of water at a time, while mixing together. The grout should be the consistency of peanut butter, so not too wet. With a glove on one hand, scoop up small amounts of grout and apply on top of the tiles/objects. Press it well into the spaces, and remove any excess. Make sure to fill in the edges and borders as well.

3. Once grout has been applied everywhere, and all the excess has been removed, allow it to sit for 10-15 minutes, enabling it to partially set. Then use a damp sponge to gently wipe the tiles/objects to clean them. Be careful not to press too hard into the spaces where the grout is, or you will remove it. Keep rinsing the sponge in a bowl of clean water, making sure to squeeze out any excess, and continue until the tiles look clean. Do not pour excess grout, or water with grout down the drain. It is a fine cement-based product that solidifies, and must be diposed of outside, or in the garbage.
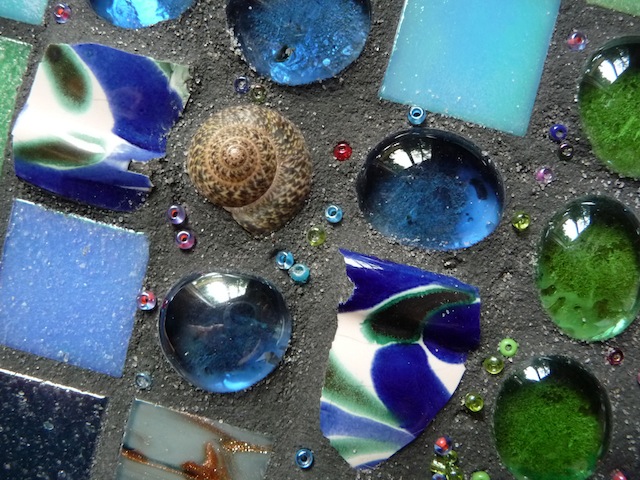
4. Allow to dry for at least 24 hours. Use an old cotton cloth (eg. old t-shirt) to give the tiles a final polishing. You can add a tiny bit of water if necessary. Use a toothpick or wooden skewer to gently remove grout which gets stuck where it shouldn’t be.
I pressed some tiny beads into the surface of the grout to brighten it up, but waited too long because most of them came out. If you decide to do this, try adding the beads earlier, when the grout is still fairly soft. Alternatively, you can glue them onto the hardened grout at the end.


I love this kind of mosaic, there are so many possible items and materials you can put in it to create a unique combination!
Thanks for sharing the tutorial!
You’re so right, the possibilities are endless with mosaics. So glad you dropped by!
I fell in love with Gaudi on a trip to Barcelona, so so so ahead of his time! thanks for sharing on craft schooling Sunday!
That’s where i fell for his work too!
Beautiful! What a fun way to collectively use bits and bobs. Thanks for sharing with SYC.
hugs,
Jann
Thanks Jann!
very cool! Thank you for sharing this post at City of Creative Dream’s City of Links on Friday! I appreciate you taking the time to party with me. Hope to see you again this week 🙂
Thanks so much Shanice!
This is such a great idea! Thanks for the tutorial!
Glad you dropped by!
This is so pretty! Imagine tiling a whole bathroom like this… 🙂
Could be pretty cool 🙂