
I’m not sure where the last 7 weeks went, but my unintentional break has finally come to an end – just in time to squeeze in some felted Santa ornaments, before the trees come down!
Materials
- wool batting or roving in a variety of colours
- bowl for water
- dishwashing liquid
- felting needles (medium and course)
- needle and decorative thread
- scissors
Instructions
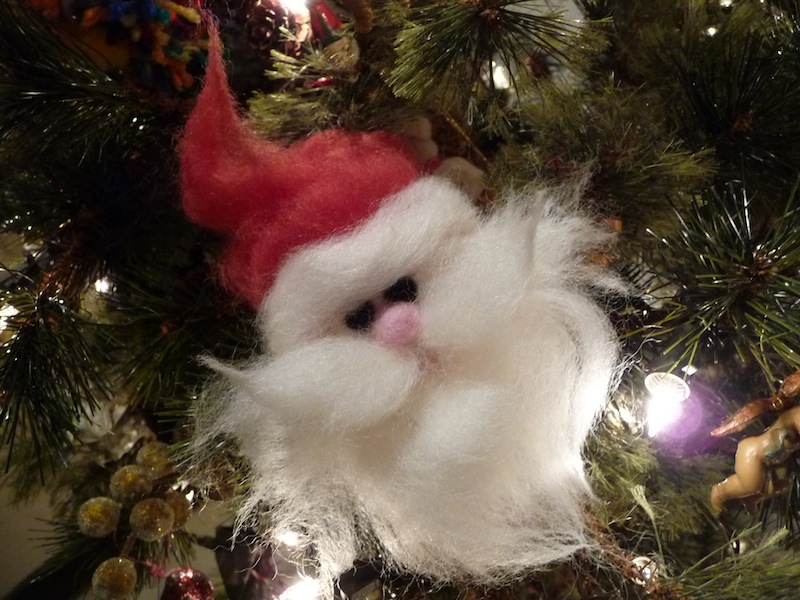
1. There are many fun Santa images to be found on the internet, and while the traditional colour combinations are great, there are plenty of other possibilities as well. The amount of wool roving required to make a Santa will depend on how big you want him to be.
Cut a length of wool roving (mine was about 8 inches long), and separate into thin sections lengthwise. Take one section and gently spread it apart.

Take the next section, cut it in half, and layer it on top of the first horizontally. Continue layering like this, alternating directions.

Roll it into a ball shape, and rotate gently between your hands until it holds that shape. It will shrink to about half the size once wet, so make sure you use enough roving.

2. Prepare a bowl of water, as hot as your hands can tolerate. Add a small amount of dishwashing liquid, and mix together. Hold the ball you have made and submerge in the water. Allow the air bubbles to be released, ensuring the inside of the ball is getting wet. Remove the ball from the water, and gently rotate in your hands. Make sure it gets nice and soapy, adding more dishwashing liquid directly to the ball if necessary. This, along with the hot water, is what enables the felting process to occur.

Alternate between rolling the ball in your hands, and dipping it in the hot water. The ball will eventually become firmer, using gentle pressure. As it firms up, you can begin to shape it into a flat oval, by applying pressure when you roll it in your hands. Set aside, and continue to make as many as you need, changing the water as necessary, so it continues to be hot.

3. Begin adding features and colours with a felting needle. I found medium and course needles worked best. Fine ones were great, but broke very easily, at least when I used them! To add shapes, hold them in place and repeatedly poke a felting needle on and around the piece of roving, until it attaches to the surface.

Apply the eyes, nose and mouth first, before adding the beard, moustache and hat.

Using a felting needle is best left to older kids, since younger ones can poke their fingers. They can, instead, be involved in making the oval shape, and selecting colours.
 I simply rested these little guys in our tree, but you can also sew some decorative thread onto the back, so you can hang them up.


I love the soft, innocent look of felting. Had no idea how it’s done until I saw this. I do want to try it some day – after Christmas for sure!
Thanks for a cute design!
I’m sure you’ll enjoy it. You can’t help but be inspired by all that lovely wool, and the amazing things people manage to make. All the best for the holidays 🙂
WOW! These Santa’s are adorable! I never worked with this material before, but it sounds like a lot of fun! These Santa would look so beautiful on the tree or even on top of gifts! Thanks for sharing! 🙂
Thank you, thank you! Haven’t done much felting myself, but it is fun, especially when you manage to not stab your fingers with the needles
Oh, that would be me for sure, stabbing myself with the needle! Ouchie! The Santa’s are so adorable!
Those are really cute! I have a felting kit that I haven’t tried yet…sheep I think. But Santa’s are much more fun!
Oooooh, I’d love to make some sheep. Sounds adorable!
Heart just melted!
Cute 🙂
Oh my gosh, I love these Santas! I’ve never seen felting done, so I appreciated the tutorial here. I’m envious and curious and may now have a new thing to try out in the crafting room after the New Year rolls around. 🙂
You really should try it out. It’s a lot of fun!
Santa is so adorable!
Dee
http://alapinlife.blogspot.com/
Thanks Dee! Adorable until he starts going down those zillions of chimneys.
Your santa is ace. Love the simplicty of his eyes and nose- it works brilliantly.
Thank you so much 🙂
They came out great. Last year we needle felted some Christmas figures too. http://highhillhomeschool.blogspot.com/2012/12/needle-felted-christmas-figures.html
I have added your blog and your santa post to my new project which tries to gather the best “wool” stories of the week around the internet. You can read it here: http://paper.li/f-1387560404
Thank you so much!
Adorable!