

I recently attended OCAD University’s annual Grad Show, which is always brimming with interesting ideas. This time, I came away intrigued by Iris Fong’s look at perspective, and thought it would be an excellent way for children to see how perspective changes, based on your relative distance or position.
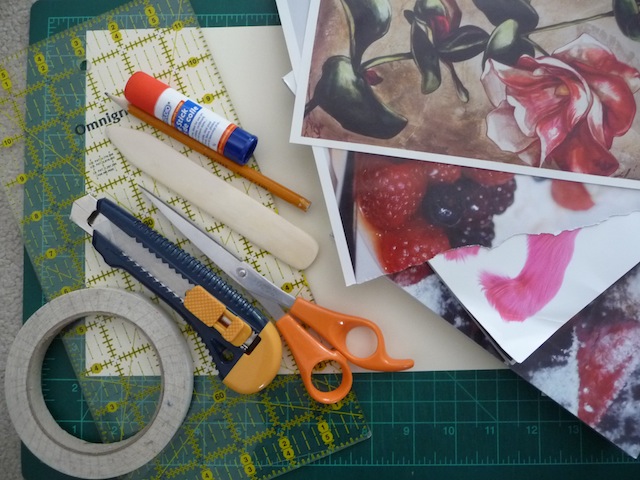
Materials
- magazines
- card stock
- pencil
- ruler
- bone folder
- double sided tape
- glue stick
- scissors
- utility knife
- cutting mat
Instructions
This is not a project about teaching children to draw in perspective, but rather, to introduce them to the idea of perspective – “the manner in which things appear to the eye with respect to their relative positions and distance.” When they look at their completed project, they will experience how we interpret things based on our perspective. In this case, what they see will depend on where they are standing.
1. The first step is to score lines, equal distances apart, on two pieces of card stock which are positioned horizontally (8 1/2″ x 11″each). A minimum space of 3/4 inch between the lines is ideal, and the easiest way to do this is using a quilting ruler and bone folder. These are both amazing tools worth owning, and can easily be found in craft/art supply stores. If you don’t have this type of ruler, any kind will do to mark the measurements with pencil, before scoring. Try to be as accurate as possible when measuring/scoring the lines.

Once completed, attach one end of card stock to the other piece by overlapping one 3/4 inch section on each one. Double sided tape will hold better than a glue stick. You will now have one long piece of card stock to glue your images on. Make sure to keep it flat and unfolded at this point.
2. Select two images from old magazines, making sure they are not too similar in colour and style. Another option is using a child’s drawings or even photographs.
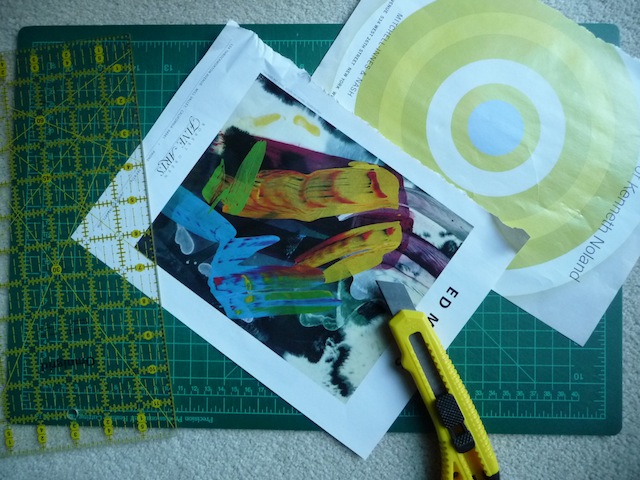
Place one image horizontally on a cutting mat, and using a utility knife, cut into 3/4 inch sections, or which ever measurement you used between the scored lines. Set the strips aside, maintaing the order they were cut in, so the image remains the same. Repeat with the second image.

3. Combine the paper strips from both images by placing one strip from the first image, a strip from the second, and alternating until all the strips have been used, and always maintaining the order they were cut in.
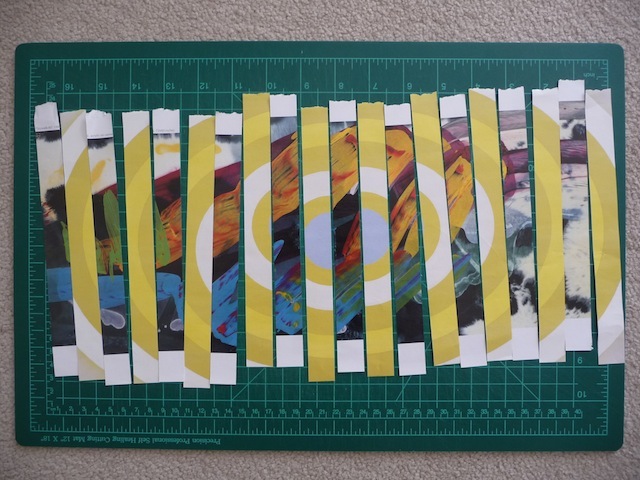
4. Using a glue stick, glue the strips of paper onto the card stock in the order you have laid them out. Make sure to line up the tops of the strips in a way that replicates the image accurately. Also, position each strip carefully between the scored lines.

Once all the strips have been glued, trim any excess paper from the edges.

5. Begin at one edge, and accordion fold along the scored lines.

What you see will depend on where you are standing. From either end, you will see the images you used, and from the front, a combination of both.


Here’s Iris Fong’s work, Perspective, from the OCAD Grad Show 2013, which inspired this project:


What a fun project! I love this idea!
So glad you liked it. Hope you give it a try!
I love this project. I have been doing it with my 3rd graders for awhile. We study space so we make a day and night one. We have also done a winter into spring. I usually cut it for them but I like the idea of the quilting ruler or bone folder.
Love the subjects you’re exploring with it. Sounds wonderful!
Very interesting !!
Glad you liked it. Can’t wait to try it with some children’s drawings.
Very cool!
Thank you Connie!
I am absolutely in love with this project! Thank you so much for sharing this project!
Thank you! We loved making it. Can’t wait to try out some other images.
I think I might try this with one photo of Nikita and one photo of Bella. That would turn out really interesting for sure!
Thanks for a great tutorial on something really fresh and exciting! This would make an excellent art enrichment experience for kids during summer break.
Thanks Joyce. I think it’s a pretty cool way to display their art work too.
Great idea! Really good for the kiddos, and something they can help make! Thanks for sharing 🙂
This is really neat! It would be even more fun with the art of your children, or something like that, do you think?
Absolutely!
I love this kind of stuff. Thanks for linking to what to do weekends. Linda
Thanks Linda!
This is a really cool project. I pinned it to my art board so I can do it with my kids for school next year.
Thanks so much Julie. Your kids are going to love it!
That is really neat. I would love to try that with a couple of my watercolours. I did try weaving two watercolours together and that gave a different perspective. I am following you from Crafty Moms Share.
Blessings,
Janis http://www.janiscox.com
Thanks Janis. I love the idea of weaving two images together. Must have looked great.
Very cool! This would be great for pictures + kids artwork.
What a neat idea. This would be a great school art project. I’ll have to pass it on to my brother who teaches gr.6 art!
Thanks Kathryn, how nice of you! I’m sure older kids would enjoy doing this.
This is SO cool! What kid wouldn’t love this art project?!? Please share at the After School Linky Party on my blog: deceptivelyeducational.blogspot.com
Thank you so much. Looking forward to linking up!
I’m SO glad you shared this at the After School Linky. Stop by my blog tomorrow. It’s one of the features from last week’s party!
Thanks so much for the feature!
What a fun project!!! I love this! Thanks for sharing at For the Kids Fridays over at SunScholars. I am featuring you at this week’s link party!!
Cool! Thanks Rachel!
What a neat lesson!! Thank you for sharing on Sharing Saturday!!
So cool! Love this idea!
Thanks Sarah!
I saw this on the Rosie O’Donnell show about 12 years ago and loved it. I think she glued the finished work in 1 inch (and pictures were 1 inch cuts) intervals so it could be framed. It has always stuck in my mind to do it, and now I have twin grandsons and was so happy to see your excellent tutorial, so I can finally do it with their photos. Will check out your other great ideas. Thanks
Thank you so much for your comment. I think we all see things we intend to try out at some point, but never get around to it. Glad I could help!
There is a great video on Yaacov Agam, an artist that does this type of work. It’s called an agamograph. This is a great lesson for any age student.