
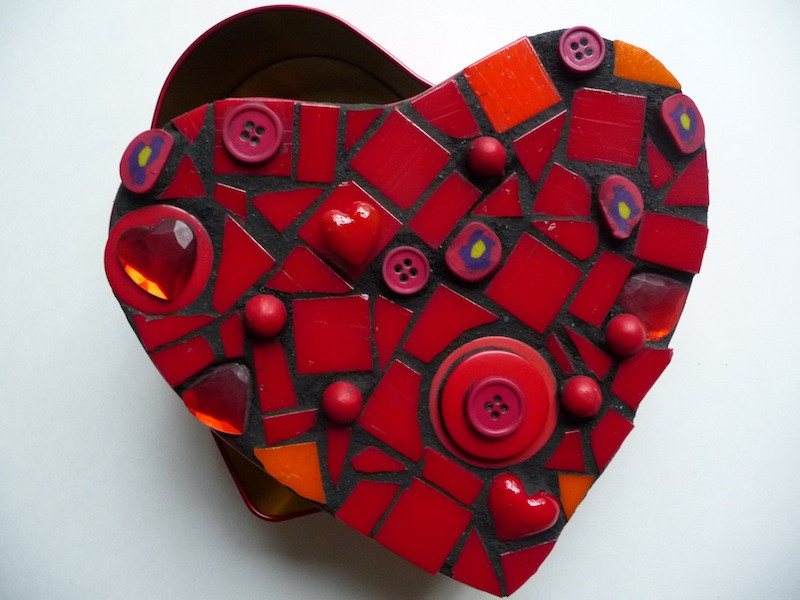
It seems we have Mr. Richard Cadbury to thank for introducing the first heart shaped chocolate box, unveiled back in February, 1861. These boxes became all the rage, and their much admired lid designs made them popular for storing household items once the chocolates ran out. In keeping with that tradition, here’s a little project to help children make their own mosaic heart box, for storing their chocolates and treasures.
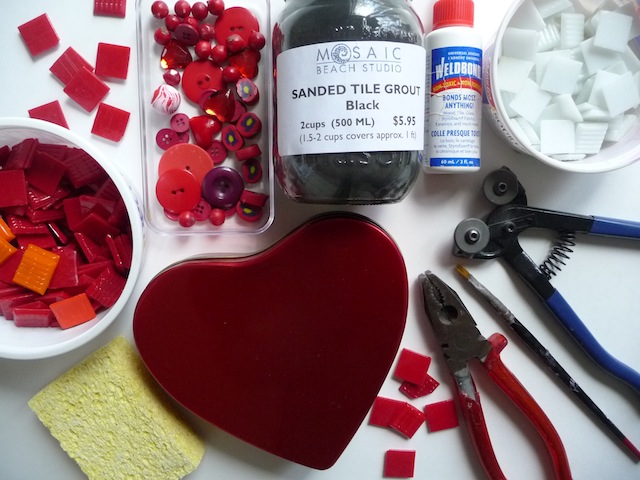
Materials
- hard surface to make mosaic heart e.g. tin or wooden box, piece of wood
- Weldbond Adhesive
- small, flat paintbrush to apply adhesive
- old plastic container and mixing tool for the grout
- pair of latex gloves
- mosaic tiles
- additional items such as beads, buttons, polymer clay designs, etc.
- grout
- safety glasses
- dual wheeled nippers
- cardboard box e.g. shoe box
- sponge and bowl for water
- cotton cloth eg. part of an old t-shirt
- toothpick or wooden skewer
Instructions
1. First, you’ll need to find a heart shaped box or a plain box to make your own heart on. Make sure the box is made out of something hard like wood, tin, or plastic. Cardboard won’t hold up to the water in the grout. Dollar stores are great places to find these kind of boxes, and is where we found ours.
2. To make the heart, collect hard objects that can withstand grout going on top. We used a combination of tesserae tiles (Venetian glass) found in craft stores, buttons, heart shaped jewels and magnets, polymer clay decorations, etc.
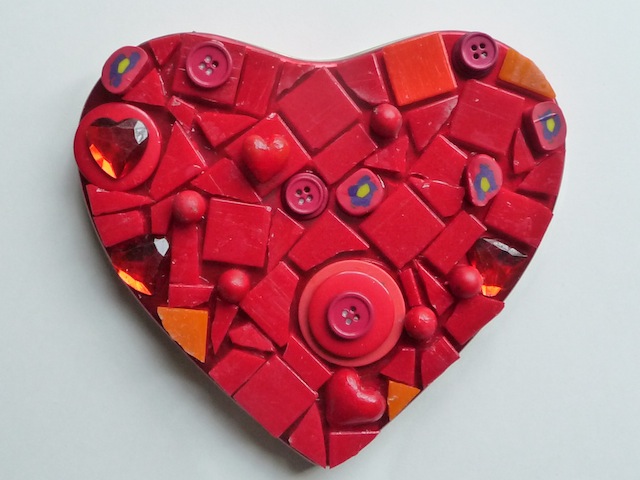
3. Making the heart requires fitting all the pieces together with just a small amount of space left between them for the grout. It’s a bit like making a puzzle. If you’re making your own heart design rather than covering a heart shaped lid, make sure to use contrasting colours to surround it and fill in the rest of the surface, otherwise the heart won’t stand out.
If working with older children, you can go ahead and cut some of the tesserae tiles to help fill in the spaces. Cutting involves using a tile cutter like a dual wheeled nipper. It can take several cuts to obtain the shape you require, and this will improve with practice. Cutting inside a shoe box is a great way to contain the small pieces of cut glass, and do wear safety glasses since small pieces can fly out.
4. You can either glue pieces in place as you go along, or lay everything out first and then glue. The easiest way to apple adhesive is to use a small, inexpensive flat brush. I recommend using Weldbond, which is stronger than white glue. Remember to apply glue to the back of tiles – the side with ridges. Once all the objects have been glued down, allow to dry for 24 hours before grouting. Your heart design can also be enjoyed without grout, in which case you would be done.
5. If adding grout, the amount you need depends on the size of the box. Prepare it by placing the grout in an old plastic container and adding small amounts of water at a time, while mixing together. The grout should be the consistency of peanut butter, so not too wet. With a glove on one hand, scoop up small amounts of grout and apply on top of the tiles/objects. Press it well into the spaces, and remove any excess. Some corners of the tiles will be more raised than others, so be careful not to cut yourself. Also, make sure to fill in the edges/borders well.

Once grout has been applied everywhere, and all the excess has been removed, allow it to sit for 10-15 minutes, enabling it to partially set. Then use a damp sponge to gently wipe the tiles/objects to clean them. Be careful not to press too hard into the spaces where the grout is, or you will remove it. Keep rinsing the sponge in a bowl of clean water, making sure to squeeze out any excess, and continue until the tiles look clean. Do not pour excess grout or water with grout down the drain. It is a fine cement-based product that solidifies, and must be diposed of outside, or in the garbage.
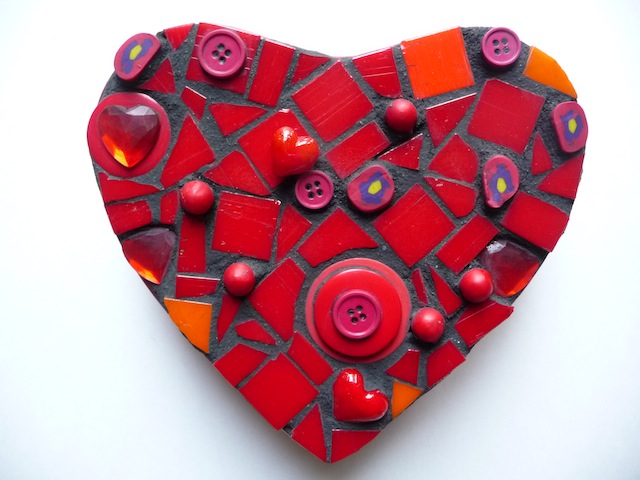
6. Allow to dry for at least 24 hours. Use an old cotton cloth (eg. old t-shirt) to give the tiles a final polishing. You can add a tiny bit of water if necessary. Use a toothpick or wooden skewer to gently remove grout which gets stuck where it shouldn’t be.

If you would like to do this project with young children, simply skip the tile cutting and grouting parts. Have them collect a variety of items to create their heart shape. This time, they don’t need to be able to withstand any grout , and can include small squares of paper, pompoms, etc.


LOVE IT! Anything to do with hearts, I’m in! Thanks for sharing! 🙂
Thanks for visiting! February must be your favourite month 🙂
Beautiful project! I had no idea about the interesting history of the heart shaped box!
Just found out myself. I kept coming across some lovely vintage ones on Pinterest and became curious.
This is so beautiful! I love the use of buttons. Also, I looked though your other projects–you have some great stuff here! Therefore, I’d like to invite you to link up at my new link party (I know, an other link party?!?) but this one is different. It is for our OLD posts, great ideas that we feel didn’t get enough attention the first time around.
http://www.dosmallthingswithlove.com/2013/01/hello-and-welcome-to-first-oldie-but.html
Hope to see you there!
Nancy
Thank you Nancy. I’m so glad you dropped by, and look forward to your party! I love the idea of being able to revive and share old posts. Brilliant idea!
So pretty! Mosaics have always appealed to me and they look like they’d be so much fun to put together. I’ve thought about doing some flower pots, but just haven’t. Maybe I will feel inspired to now! Thanks for sharing the step-by-step details!
Thanks Laurie. Years ago, I was volunteering to help out at a school, and was asked to make a mosaic tray with a group of children. I didn’t know the first thing about mosaics, and promptly signed up for a class. It was very helpful to learn about how to apply grout properly, but the rest came from the internet. Flower pots sounds like a wonderful idea. Go for it. You’ll love the experience!
Beautiful box!
Thanks for linking to a Round Tuit!
Hope you have a fabulous week!
Jill @ Creating my way to Success
http://www.jembellish.blogspot.com/
I love this heart box! It’s extremely cute!!!
T’onna @ Submarine Sunday
http://www.navywifeypeters.blogspot.com/2013/01/submarine-sunday-14.html
Thank you! Now I’m enjoying all the chocolates inside, which was the reason for making it in the first place 😉
So beautiful! An absolute treasure!!
Thank you so much Diana!
Pingback: 20 Valentine's Day Ideas - Creatively Living Blog
So pretty and fun!! I love it! Thanks for sharing it at Shine on Fridays this week
Ohh, this is so lovely, sweet, beautiful! What a very creative idea!
Hopping by and following your lovely blog’s FB and Pinterest. I blog @ Getting Healthy with Essential Oils
I am also inviting you to join Tiddle Diddle Handmade Shoppe’s first giveaway event.
Thank you so much Lynn. I’m so glad you dropped by and look forward to visiting your blog!
Wow! That is beautiful! Thanks for sharing a tutorial
Also, thanks for linking up Sharing Saturday!
I’m so glad you enjoyed it! And thank you for hosting 🙂
I came here from Teach Beside Me’s link up. This is just beautiful!! I’m going to have to try this out soon, and I’m going to Pin this so I can remember.
Wonderful! I hope you enjoy making it, and thanks so much for visiting.
Wonderful, love this 🙂 featuring on this weeks Creative Monday’s hop,thanks for linking up last week…
Thanks Claire. You made my day!
Super cute! Found you via the Crafty Cowgirl.
Thanks for visiting!
So creative! Thanks for sharing at the Crafty Cowgirl Funday Sunday – can’t wait to see what you share next week!
lovely! We found you via Life on Lakeshore Drive – A Bouquet of Talent Linky Party.
Thank you 🙂
Hi,
You have some great ideas and we would like for you to share with our readers too. We are hosting our first link party tomorrow and we would like to invite you to link up with us. We have a fun blog to co-host with us. Hope to see you there.
Thanks!
The Busy Bee’s,
Myrna and Joye.
http://thebusybhive.blogspot.com/
Thanks so much Busy Bees! Looking forward to your first party 🙂
Wow, your mosaic heart box is beautiful! I love it. Thank you so much for sharing at A Bouquet of Talent! Happy Friday and have a wonderful weekend. 🙂
Hugs
Kathy
Hello, I will be featuring this beautiful box on this weeks Sharing Saturday. I hope you come back and share with us again!
And I’ll be featuring on Share It Saturday! Fantastic craft- simply beautiful!
Thank you so much!
Thanks for linking up such a awesome and inspirational project! Come stop by again this week and link up another project here: http://bowdabrablog.com/2013/01/26/saturday-showcase-craft-project-linky-17/!
Have a good week!
Susie@Bowdabra
Wow! This is just beautiful! I love the idea of simplifying it, and making it a children’s craft too!
Thanks Jackie!